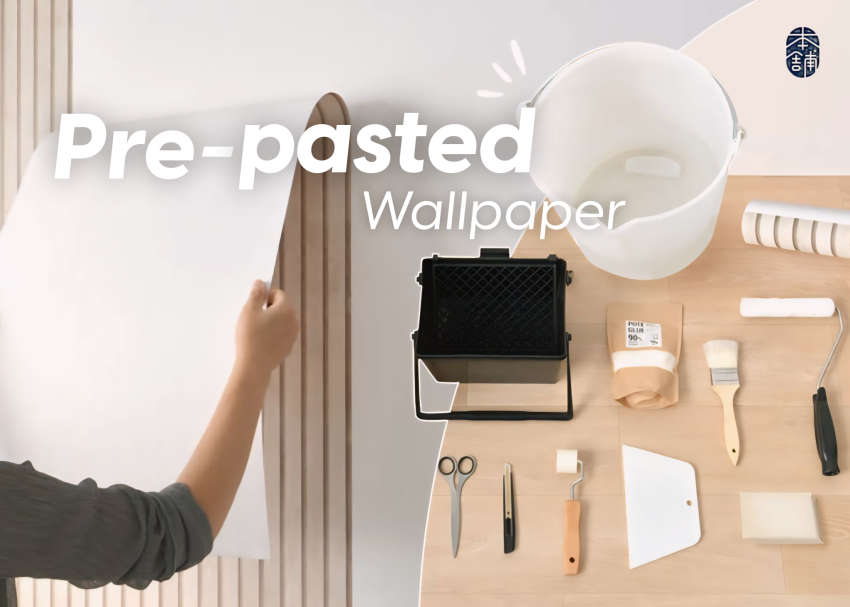
Pre-pasted wallpaper is a modern solution that makes it easy to transform any room. With Japan’s technology, it revolutionized the wallpaper industry. Traditional wallpaper requires you to apply glue separately to the backing so that it sticks well. However, pre-pasted wallpaper is more sophisticated. Peel off the sticker on the back to stick on the wall without additional adhesive. Of course, it saves time, energy, and thought during the installation process. Let’s deep dive into this article to know about pre-pasted wallpaper, how to apply pre-pasted wallpaper, and remove it, so keep scrolling!
Why Pre-pasted Wallpaper is Perfect for You?
Each type of wallpaper has its advantages and disadvantages. However, how to apply pre-pasted wallpaper can be the most convenient and practical. However, you have to be sure before deciding. For this reason, we share several reasons why pre-pasted wallpaper can be the right choice below. 1. Ease of Application As explained previously, how to apply pre-pasted wallpaper which has a hassle-free installation. You no longer need to mix glue all over the wall surface. Pre-pasted wallpaper is complete with adhesive on the back. That’s why people also call it pre-glued wallpaper. Simply activate the adhesive, hang the wallpaper, and smooth it to get a beautiful finished look.
2. Time-Saving
 Pre-pasted wallpaper can significantly save installation time. Compared to traditional methods, it cuts installation time by up to 40%, saving both time and effort. You can skip measuring, mixing, and applying the paste. Just soak the wallpaper in water or use a wet roller so that the wallpaper can stick well. Therefore, you can complete the project faster.
3. Less Messy
 Pre-pasted wallpaper is great for minimizing mess. The glue has fused to the back of the wallpaper. You don’t need to worry about splashes or drips of glue like traditional wallpaper. Of course, it makes the installation process cleaner and reduces the hassle of cleaning up afterward.
4. Removable Options
 Even though the adhesive is strong, you can easily remove the pre-glued wallpaper as desired. You can simply remove the edge of the wallpaper if you want to replace it. The wallpaper will not leave stubborn traces and damage the wall surface. That makes it easier for you to correct the position until it is correct. The advantages also make pre-glued wallpaper an ideal choice for house renters or anyone who easily gets bored with their living space appearance.
5. Crafted from High-quality Vinyl Chloride
 With the advances in Japanese technology, pre-pasted wallpaper has high durability. Apart from that, it often has anti-fouling properties. It means that dirt doesn’t stick easily. Some wallpapers even have deodorant and anti-bacterial features, creating a fresher and more hygienic environment.
Let’s try Step-by-Step How to Apply Pre-pasted Wallpaper!
 Some people have difficulty installing wallpaper by themselves. They use the services of professional installers as an alternative. However, it requires additional costs. Luckily, pre-pasted wallpaper is here as a solution. We have also explained the convenience of how to apply pre-pasted wallpaper in detail here. But you need to pay attention to the things below for perfect results. Just look at these steps of how to apply pre-pasted wallpaper for maximizing the result!
1. Initial Preparation
 First of all, prepare the equipment well. Good preparation is important for any DIY wallpaper installation. You must ensure that the wallpaper installation equipment is complete and suitable for use. Besides being more conducive, it will save time and avoid frustration during installation.
WHAT TO PREPARE
- Honpo Wallpaper Installation Tools – 7 Piece Set
- Caulking Agent (optional)
- Masking Film (can be substituted with newspaper)
- Measuring Tape
- Scissors
- Coin and Thread
- Screwdriver
- Pencil or Pen
- Stepladder
2. Groundwork Preparation
 Preparing the wall surface is important to ensure high durability. In this step, you can remove old wallpaper (if any), move wall decorations, clean dirt, and smooth the walls from cracks. There are 2 ways to do this:
REMOVE AND REPLACE OLD WALLPAPER
- Cut around the edges of the old wallpaper.
- Make a slight cut with the cutter in a suitable place and start peeling.
- You can leave the thin backing paper (if any), remove everything on top.
- Fill out the holes of the wall with putty.
- Leave the putty to dry for at least one full day and then smooth it out with sandpaper.
3. Drawing a Straight Line On the Wall
 You must pay attention to the size of the wall according to the size of the wallpaper. Apart from that, you should keep the wallpaper strips straight when installing. This avoids the sticking moving when the wallpaper has been installed because the glue that has dried cannot be set again.
DRAW A REFERENCE LINE
- At the top of the wall, measure 90cm from the right and mark it.
- Prepare a piece of thread tied to a coin, and hang the thread from the mark.
- Draw a vertical line along the thread with a pencil (dotted is better).
- Determine the wall where the wallpaper will be installed
- Measure the height of the wall from floor to ceiling with a measuring tape and record it
- Measure the width of the wall by stretching out a measuring tape. Hold the ends firmly on the floor next to the wall.
- It is best to avoid installation and measurements that stop in the middle of the wall
4. Cut the Wallpaper and Fold It

CUTTING THE WALLPAPER
- Roll out the wallpaper after covering the floor with a masking film (newspaper). Check with the video to see how it’s rolled out.
- If it is plain, cut the wallpaper to the height of the ceiling + 10cm for wastage. (Please consult [email protected] for pattern repeat wallpapers)
- Peel the film out and throw it away.
- Gently fold the wallpaper together so that they do not press and leave marks.
- How to fold can be seen in GIF animations and YouTube videos.
5. Installing the First Strip
 Now it’s time to put up the wallpaper! If you want the best quality, try pre-glued wallpaper from Honpo. All Honpo pre-glued wallpaper collections contain the finest adhesives. If you fail to install it, Honpo wallpaper is easier to remove again to the best position. Below, you can check the steps.
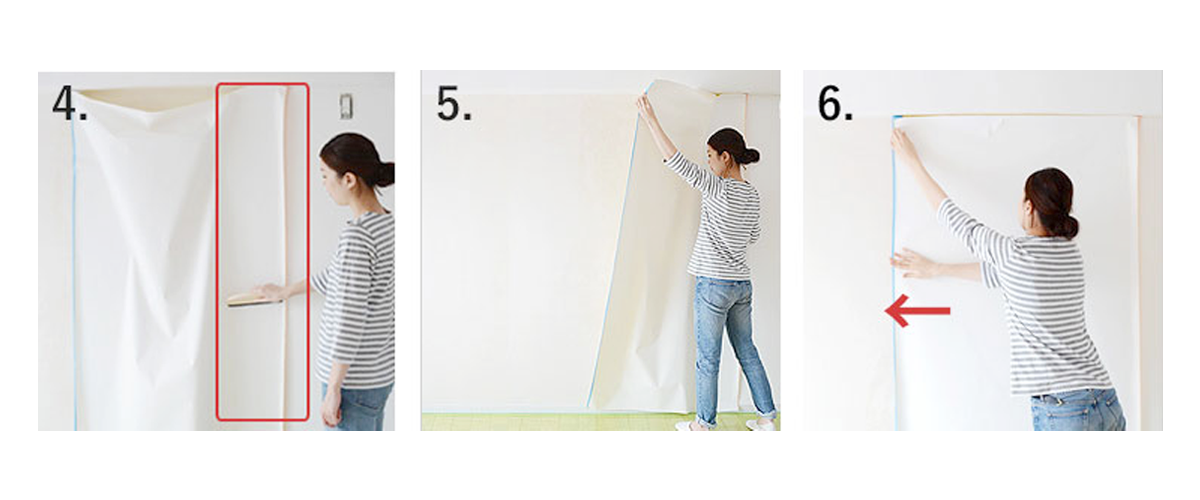
 1.Place the folded wallpaper under your feet and lift the edges to spread it out.
2.Leave extra about 5 cm above and below, and stick it at the approximate position.
3.Push to the bottom right edge to create a sag on purpose.
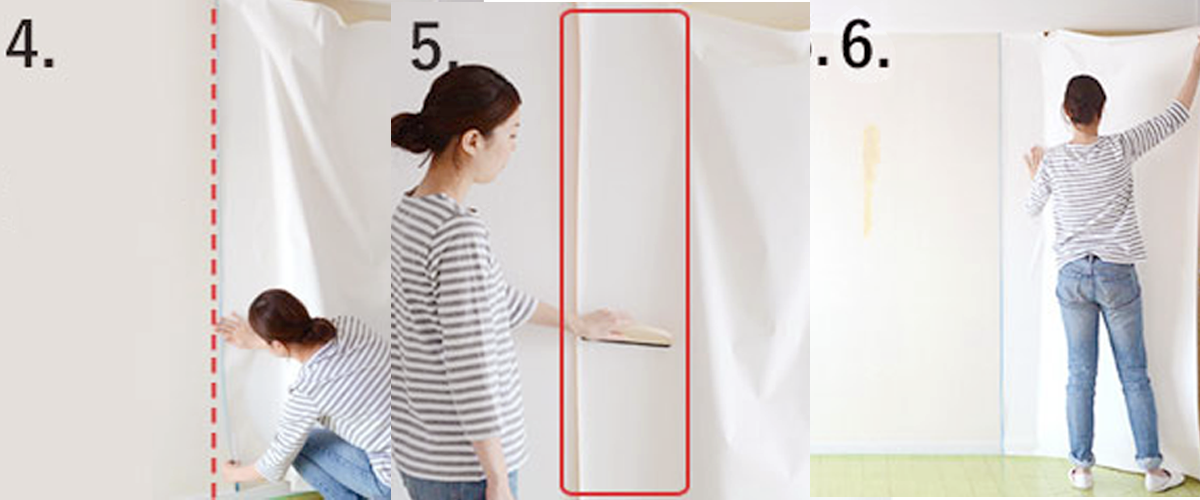 4.Align the left end of the wallpaper with the reference line. Since the paste is fully applied, you can shift it after pasting.
5.Once the left end position is determined, brush out the air bubbles.
6.Hold the right end to raise (turn over) the wallpaper. Be careful not to flip up the left end that’s already being brushed.
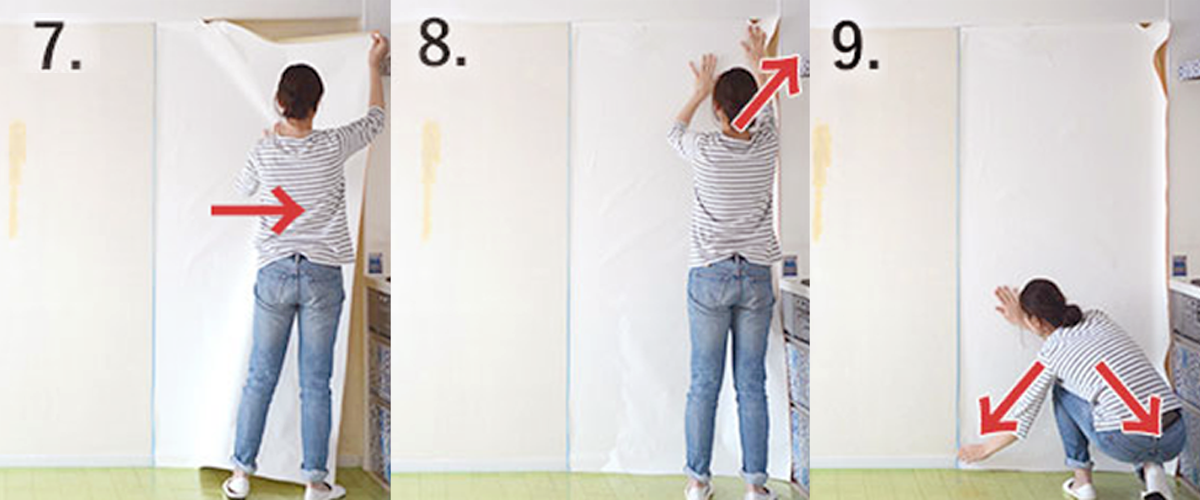 7.From left to right, stroke the middle of the wallpaper with your hand to smooth out wrinkles and paste.
8.Next is diagonally upward from the middle.
9.Then, from the middle, diagonally down and fix the position roughly with your hand.
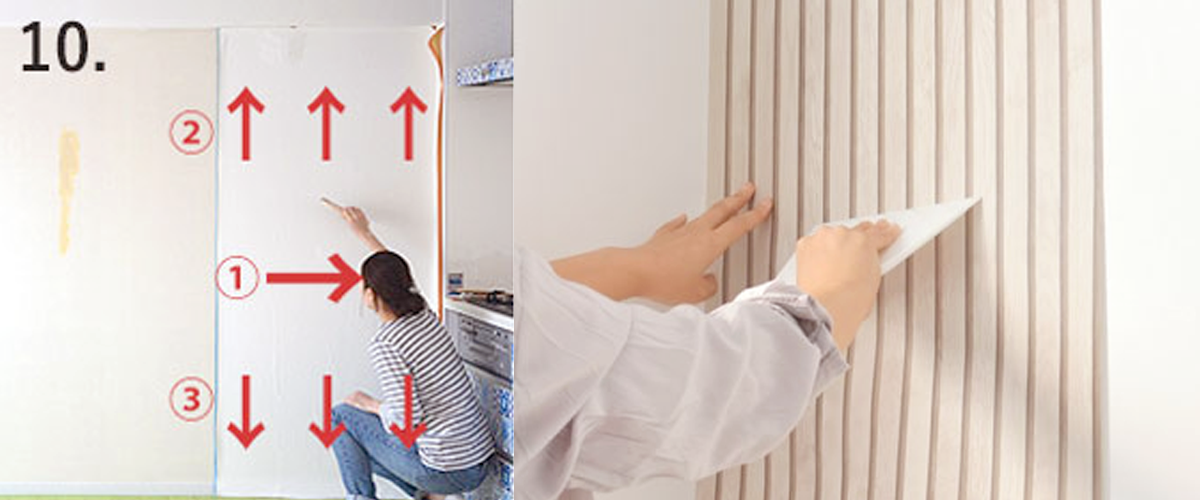 10.After the position is fixed, brush out all the remaining air bubbles.
6. Cutting Out the Extra
 For plain wallpaper, it is best to cut the wallpaper 10 cm higher than the ceiling height (as in Step 4). This means that when cutting from the master roll, the surface may not be straight, or the surface will be uneven. By leaving the top and bottom, you can install the wallpaper without any gaps at the edges.
CREASE THE EXTRA PART
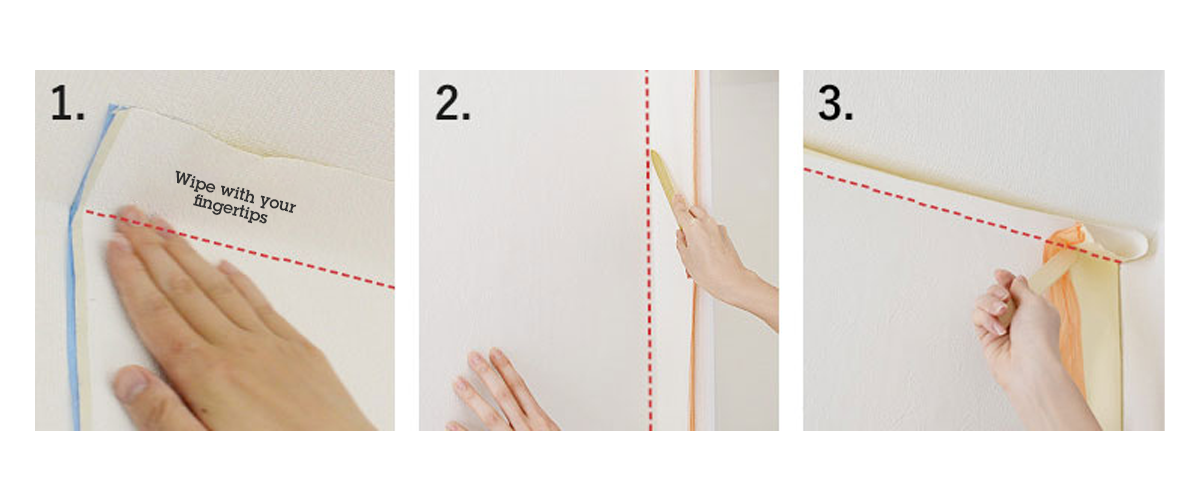
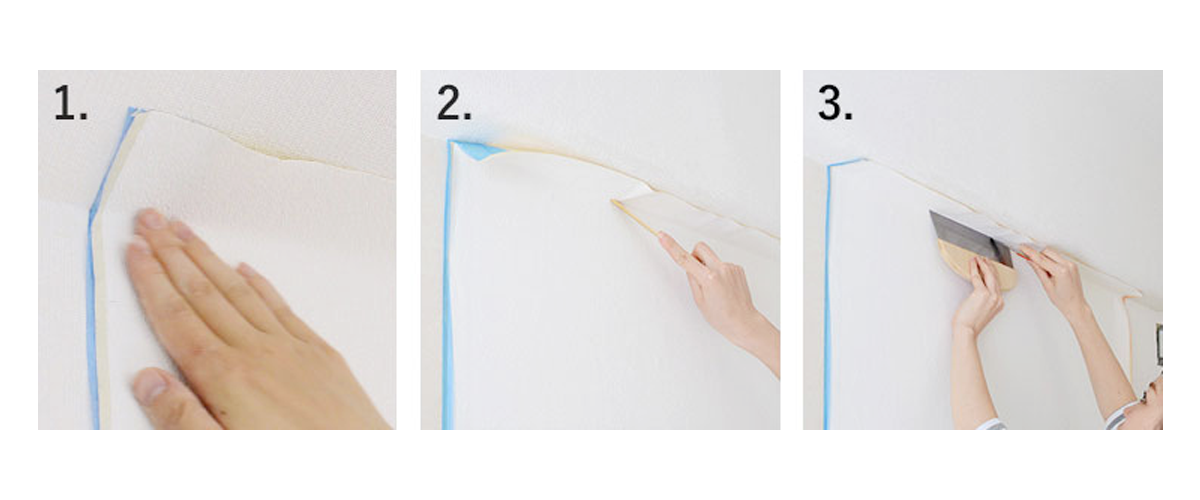
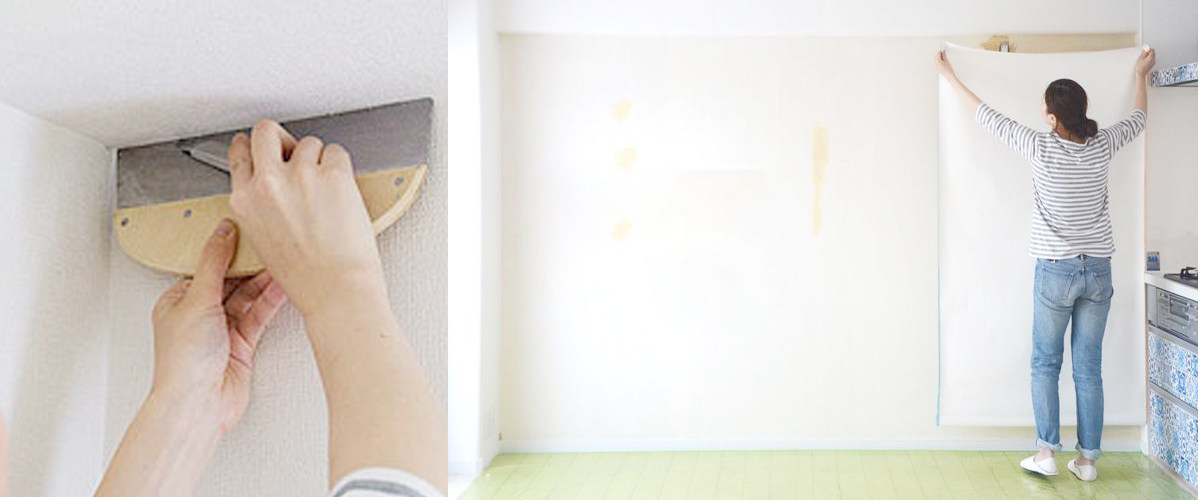
- Wipe the corner of the wallpaper with your fingertips so that the end of the wallpaper can stick to the corner neatly.
- First, fold the wallpaper from the right corner using a bamboo spatula.
- Next, make a fold between the top and bottom sides. The point is to fold the corner in half.
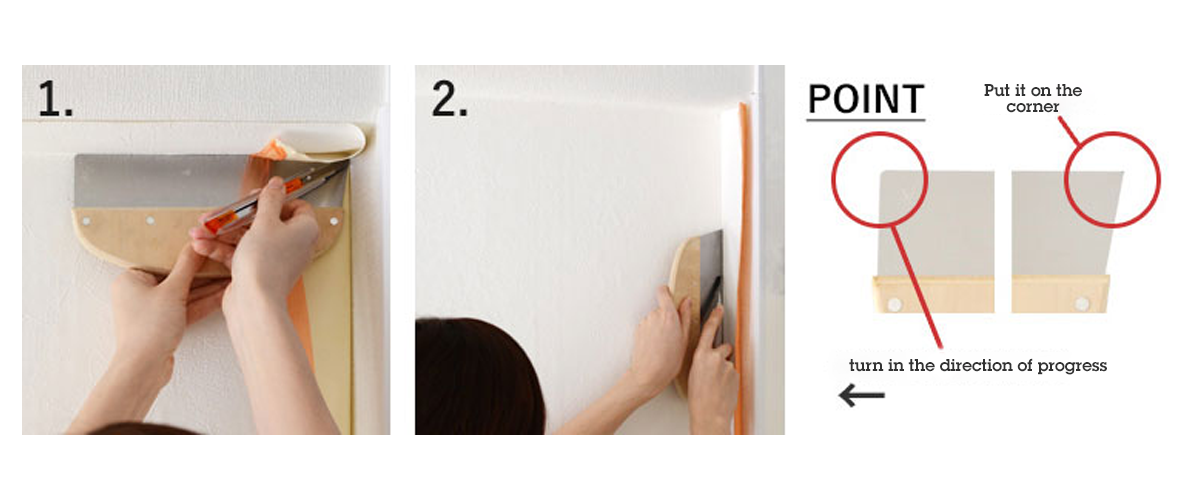
- Place the ground spatula firmly into each corner, then cut off the excess edge. When cutting begins, slide the cutter without removing it from the wall. Make sure the cutter is sharp and strong enough.
- Next, cut off the excess at the right end in the same way.
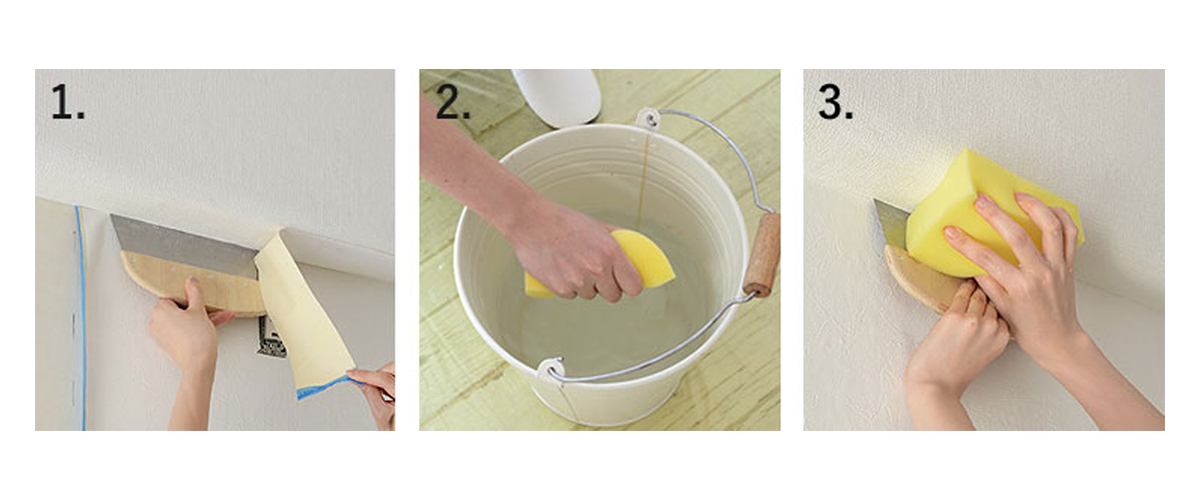
- After cutting, pull out the extra wallpaper.
- Wet the sponge and squeeze it firmly.
- Wipe off the remaining glue thoroughly, as it may cause discolorization in some cases.
7. Paste the Second Strip (And So On)
 When attaching the second strip of wallpaper, use the side tape attached to the left and right as a guide for joining the strips. Note that the direction of air bubble removal is reversed to the first one!
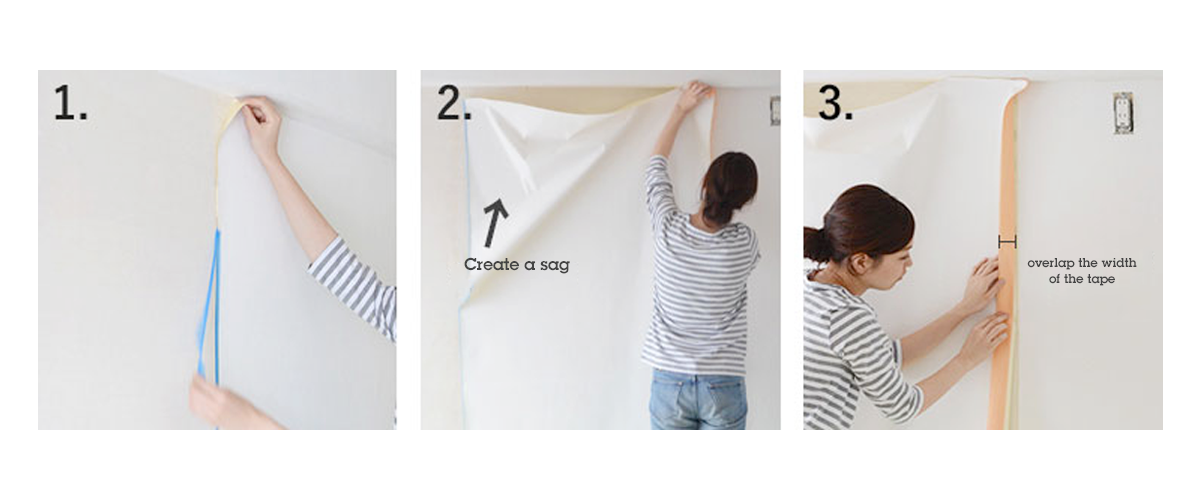 1.Remove the first side tape.
2. Attach the second piece to the approximate location and push to the bottom left edge to create a sag.
3. Leave extra 4cm towards the right end (width of the tape).
 4. Once the line on the right end is fixed, brush out the air bubbles.
5. Hold the left end to adjust the wallpaper. Do not flip up the right end that has been brushed.
6. From right to left, stroke the middle of the wallpaper with your hand, stretch out the wrinkles and paste.
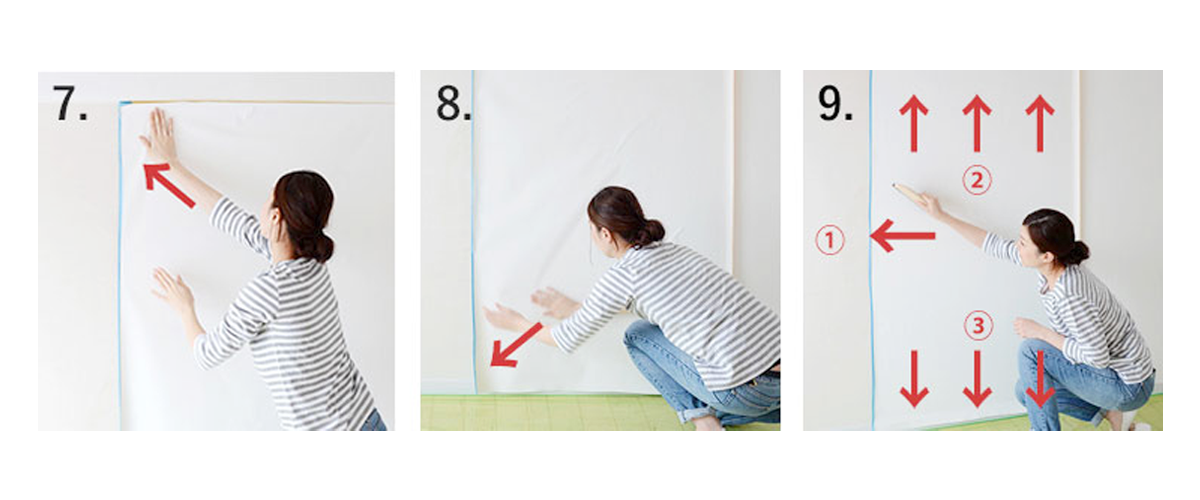 7. Next is diagonally upward from the middle.
8. Then, from the middle, diagonally down and fix the position roughly with your hand.
9. When it is almost fixed, brush out the air bubbles.
CUT EXTRA
- Stroke the corner with your fingertips, just like the first one.
- Crease with a bamboo spatula.
- After cutting the top and bottom excess, wipe the remaining glue with a sponge.
8. Cutting the Joint
 One of the most challenging part of wallpaper installation is the joints. It feels great if the joints are done neatly. Make sure the cutter is sharp before moving on.
CUT THE JOINT
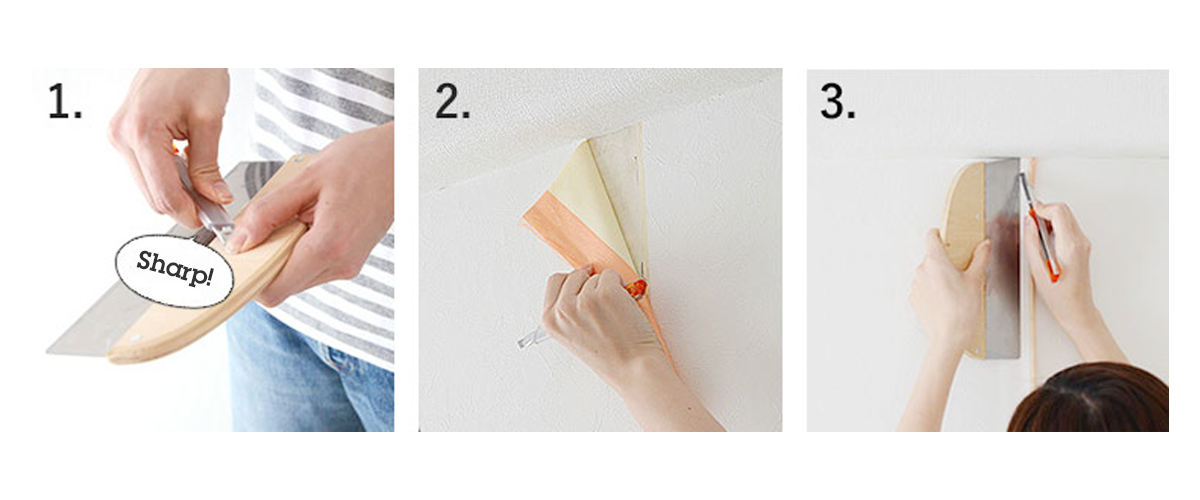 1.Fold the blade of the cutter frequently to keep it sharp.
2. Flip up a little and check the overlap.
3. Cut both layers in the overlapping middle area.
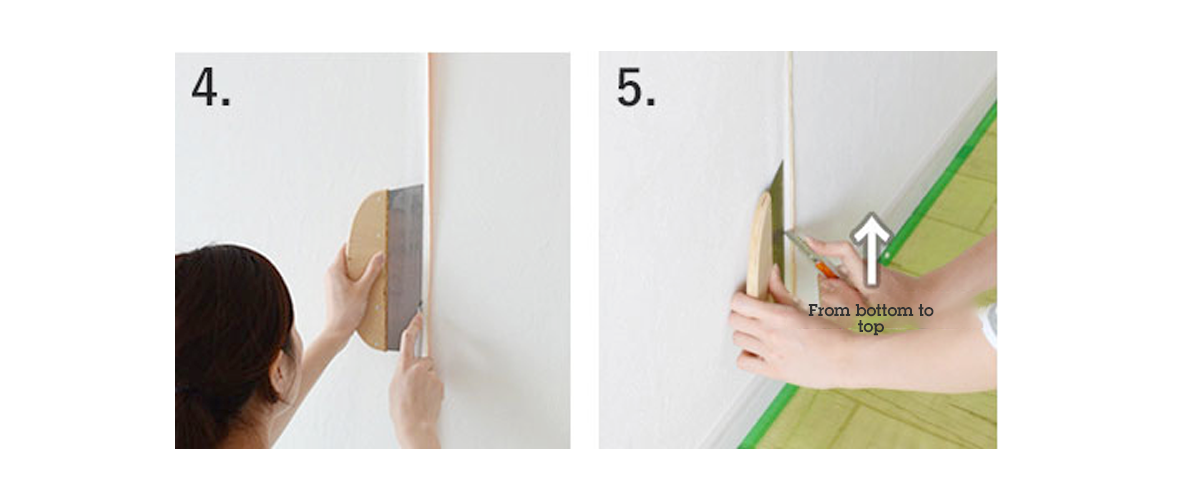 4. Continue to adjust the cutter + ground spatula down and cut. It is necessary to be careful not to cut it down to the ground.
5. Cut the bottom a few centimeters from bottom to top.
PULL OUT THE EXTRA AND CRIMP THE JOINT
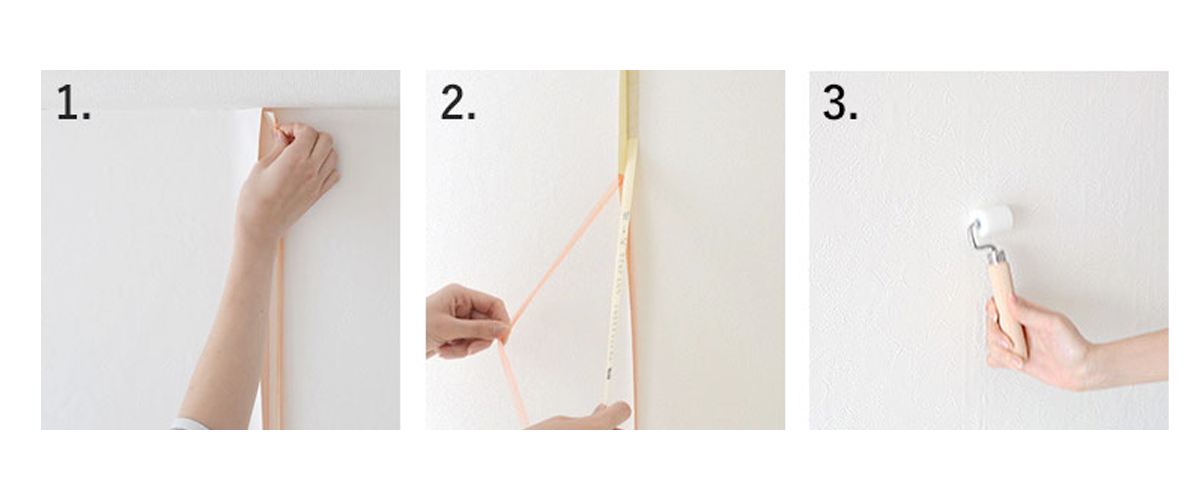
- Remove the cut excess.
- Flip over the joint and be sure to remove the tape on the back of the second strip and the excess from the first strip.
- Crimp the joint with a joint roller.
9. Paste the Final Strip
 You have finally reached the last strip! Cut to the remaining wall width + 10cm width, and the subsequent process is the same as the first one!
MEASURE THE REMAINING WIDTH AND CUT
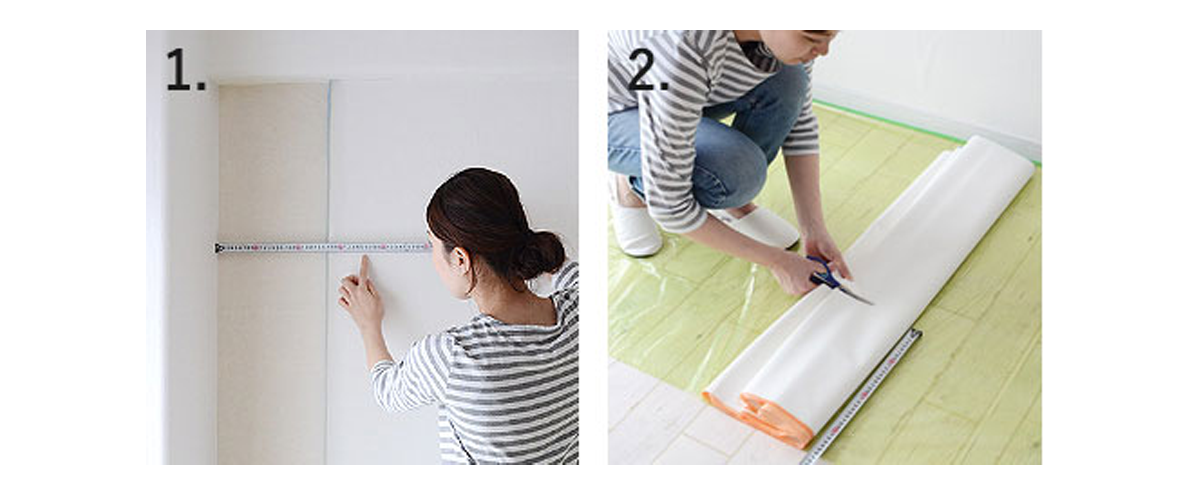
- Measure the width of the remaining wall.
- Cut the wallpaper into the remaining width + 10cm width.
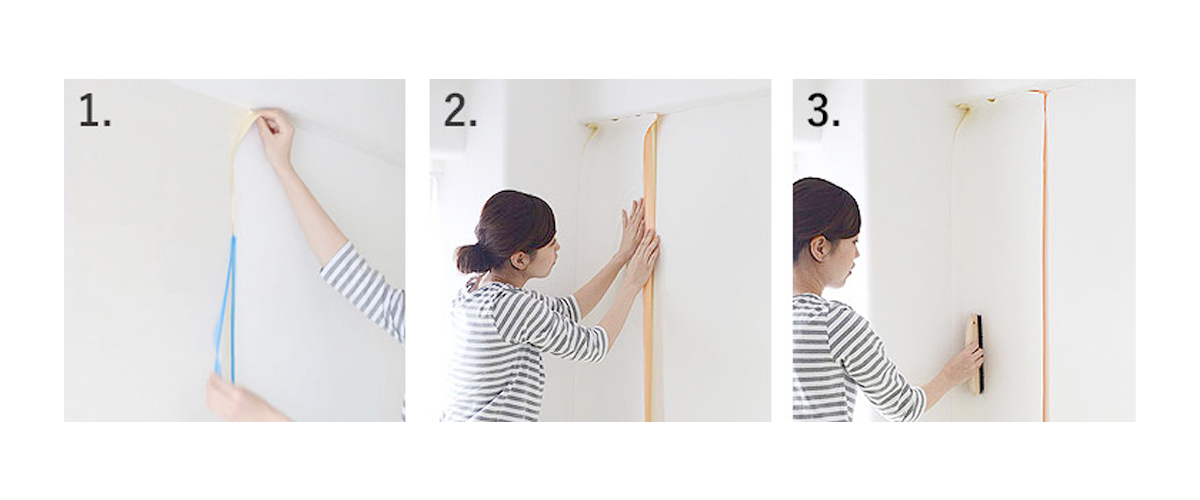 1. Remove the side tape from the pasted wallpaper.
2. Leave about 4cm (about the width of the tape) and paste.
3. Brush out the air bubbles.
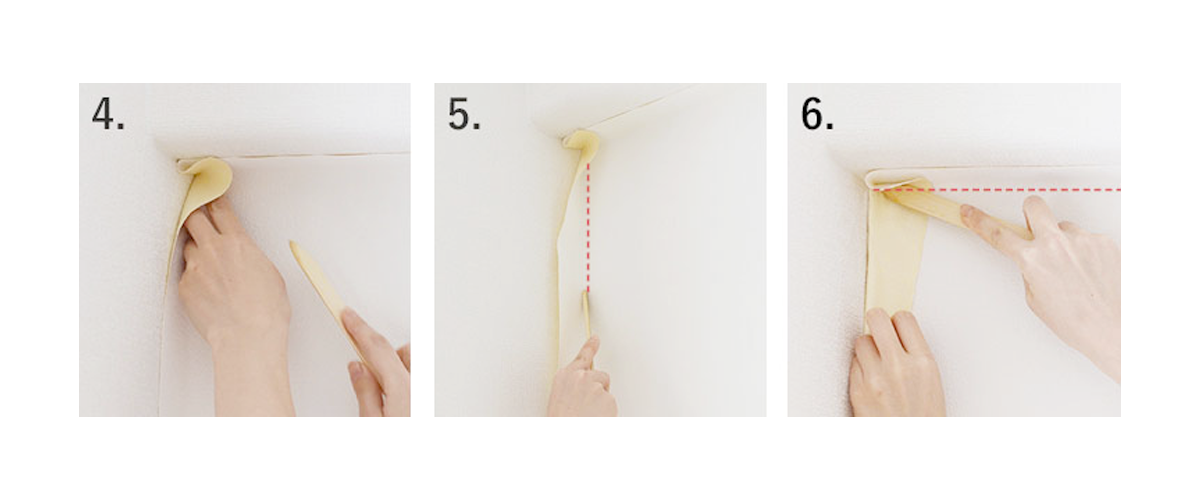 4. Stroke the corner with your fingertips and gently press the wallpaper into the corner.
5. Crease the corners of the left vertical edge with a bamboo spatula.
6. Fold the corners in half and crease the corners at the top and bottom
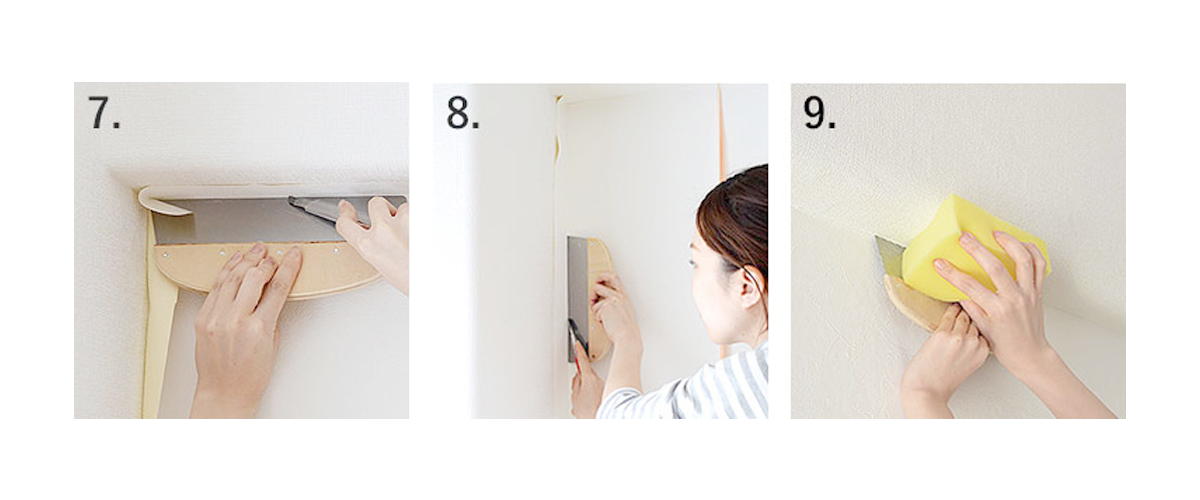 7. Cut the top and bottom extra with a cutter and ground spatula.
8. Cut the left vertical edge extra.
9. Use a sponge to clean up the remaining glue.
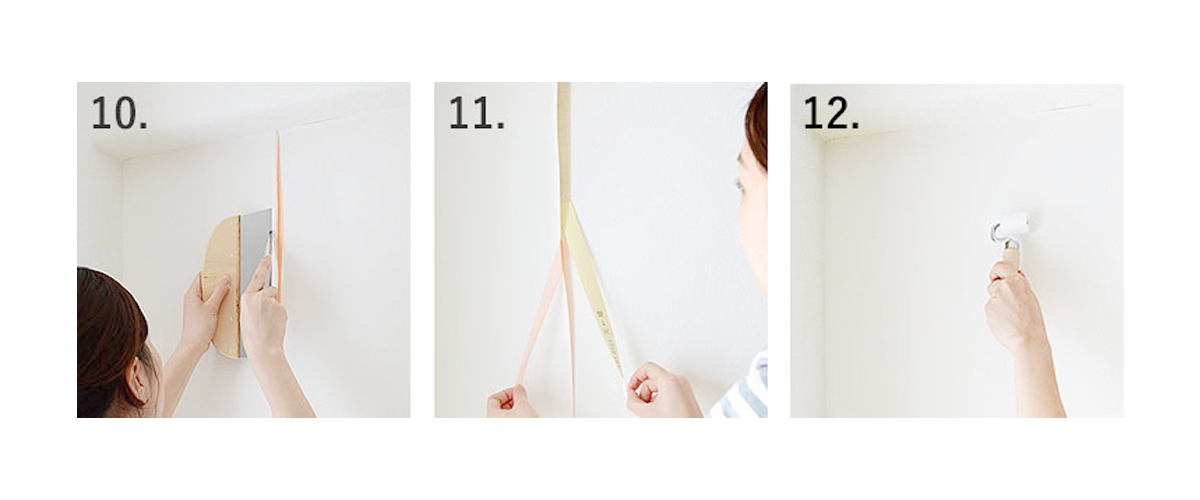 10. Cut the joints.
11. Pull out the extra
12. Crimp the joint with a joint roller.
10. Finishing Up With a Caulking Agent
 Finally, with a little extra touch up, the newly installed wallpaper will look even more beautiful. Using a caulking agent prevents the wallpaper from peeling up from the edges just in case. It is also great for covering up failed joints. Make sure the color of the caulking agent matches the wallpaper.
CAULK AROUND THE EDGES
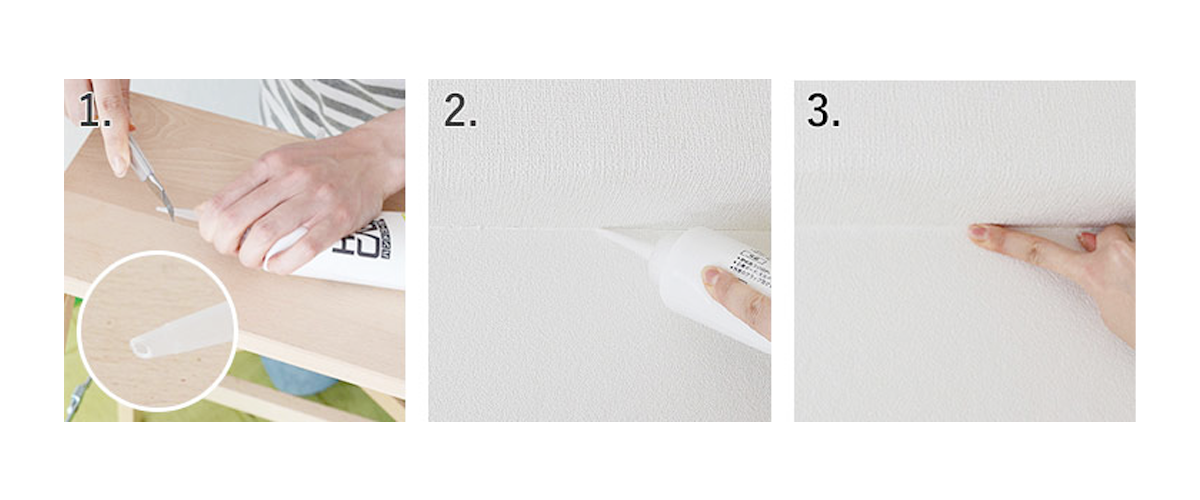 1. Cut the mouth of the caulking agent diagonally.
2. Inject caulking into the corners.
3. Trace with your finger. Wipe the excess caulk on your finger with a sponge from time to time.
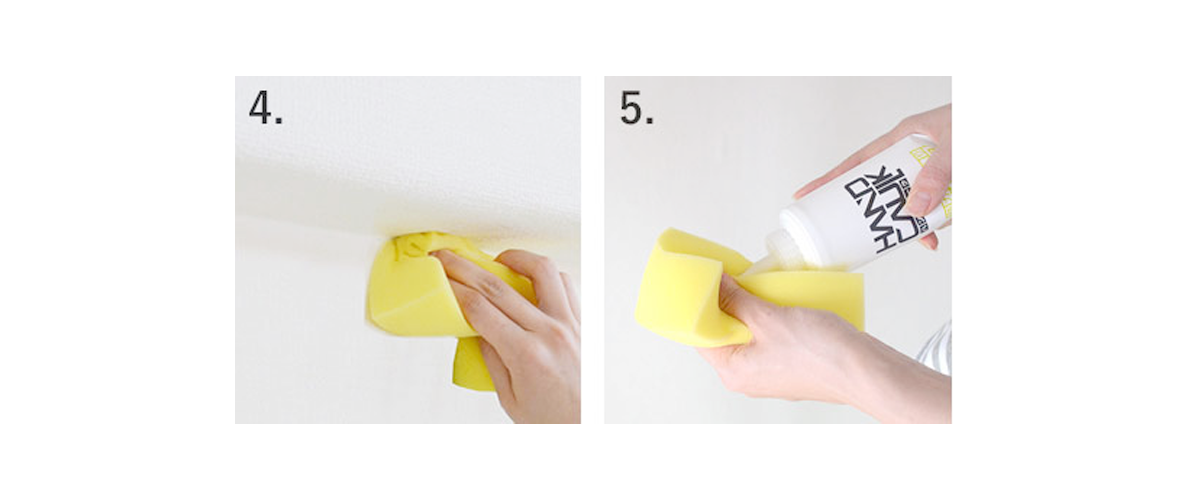 4. Gently wipe with a sponge.
5. After use, wipe the mouth and put the lid on, and keep it away from sunlight.
COVERING UP FAILED JOINTS
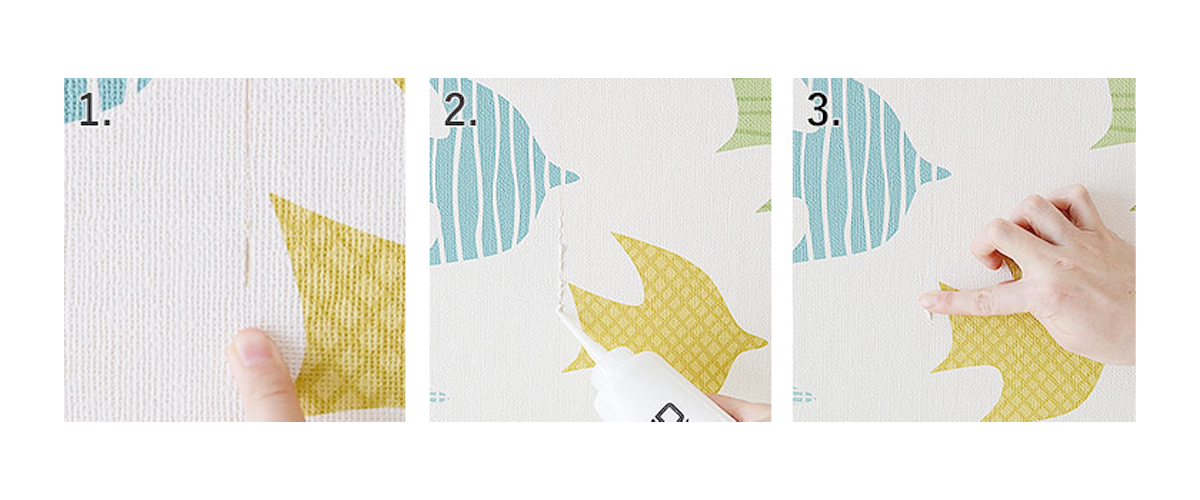 1. If there is a failed joint, you can make it less noticeable if the wallpaper is a color that matches the caulking agent, such as white.
2. Caulk the gap.
3. Smooth with your finger. Gently wipe with a sponge.
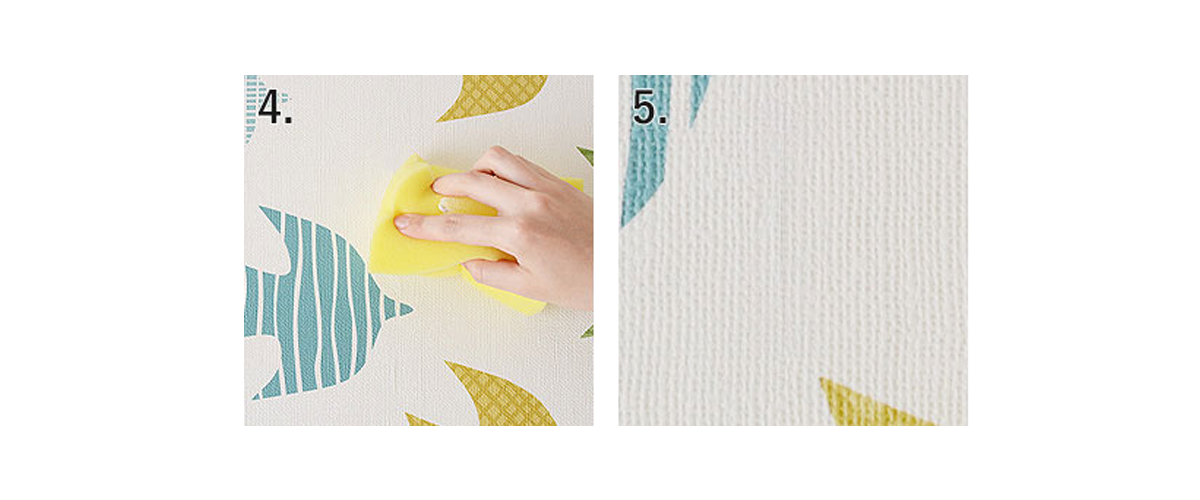 4. It is no longer noticeable!
How to Remove Pre-pasted Wallpaper?
 After knowing the steps for how to apply pre-pasted wallpaper, it is also important to know how to remove it. That will come inhancy when you want to redecorate someday. Here are three easy steps for removing wallpaper properly.
1. Prepare the Room
 Before starting, remove any objects that may interfere with the wallpaper removal process. Then, cover the floor with cloth or old newspapers. It will hold dirt to the floor, and you can clean it easily and quickly. Cover with tape if there are sockets in the wall area. That is to prevent water damage.
2. Peel the Wallpaper
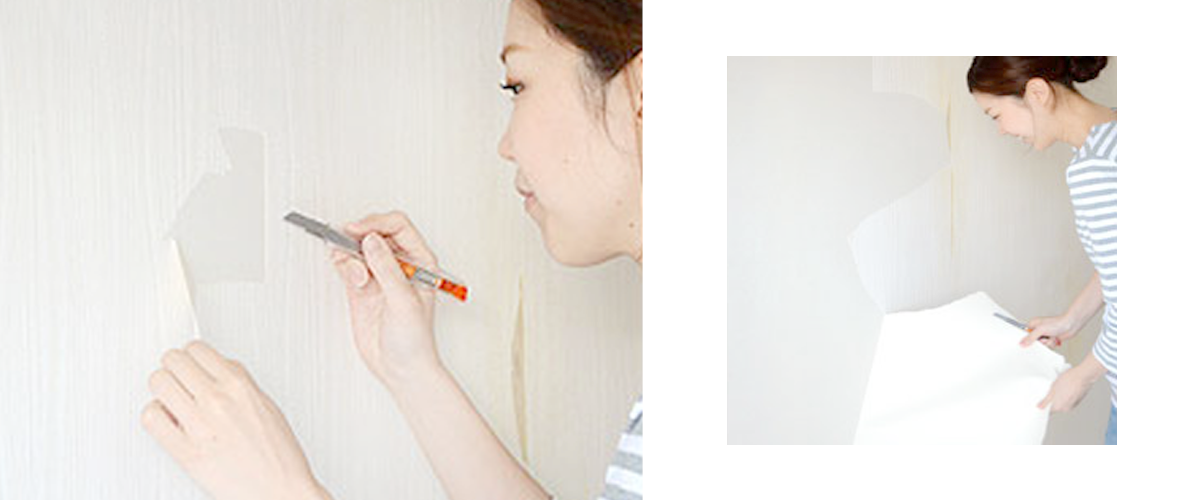 After preparing the room, loosen the wallpaper at any edges with a putty knife or wallpaper scraper. It’s better to start from what is easy to reach. Then, lift slowly to create a starting point for release. If it hasn’t peeled off, use a sponge or spray bottle filled with warm water on the surface of the wallpaper. Warm water can activate the adhesive and make it easier to remove. Work slowly and carefully so as not to tear the paper. Continue using hot water as you peel it off to keep the glue moist.
3. Clean the Walls and Get Ready for New Appearance
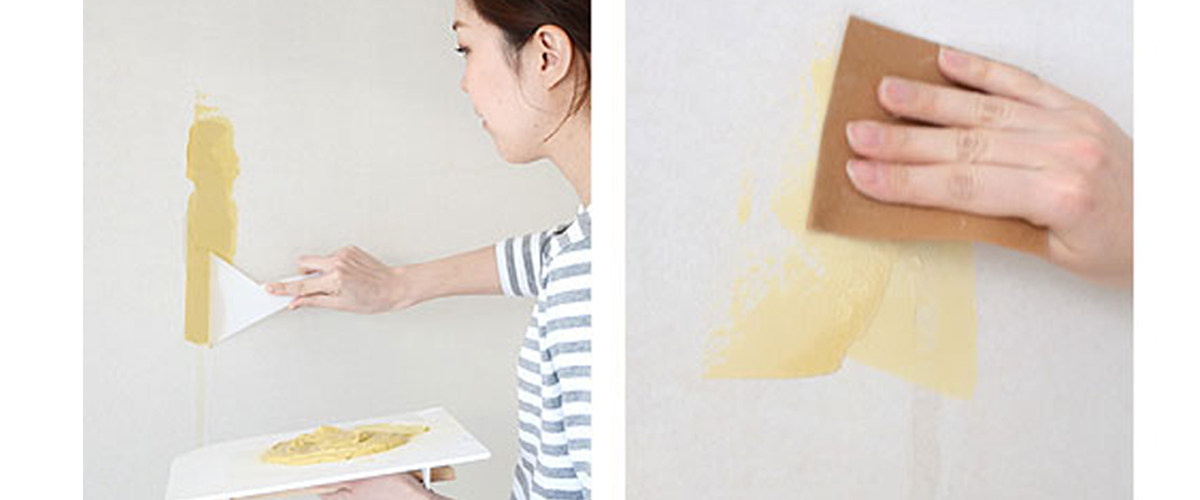 After removing the wallpaper, dampen a sponge or cloth with warm water to wipe away any remaining adhesive. Use a wallpaper remover for stubborn adhesive. Once the adhesive is gone, use a mild detergent and a sponge to clean the wall thoroughly and let it dry. Check for damage or imperfections, such as holes or cracks. Repair with putty or something else if possible. Once smooth and dry, give it a coat of primer and install new wallpaper or other decorations.
Where Can You Find the Best Pre-pasted Wallpaper in Singapore?
High-quality wallpaper is the solution to get perfect results. Despite the wide variety of wallpapers, Honpo offers the best pre-pasted wallpaper in Singapore. Not only that, Honpo is also the first wallpaper company to introduce this kind of wallpaper in the Southeast Asia market. With Japanese technology, pre-glued wallpaper reduces your installation workload by almost 40%. It means you can use your time and energy for other things. Therefore, pre-glued wallpaper is also booming among Japanese people. It is proven by sales of around 10,000 m every day.
Thus, a complete explanation of prepasted wallpaper includes how to apply pre-pasted wallpaper to remove it. Pay more attention during installation or removal to minimize any problems. Let’s create your dream come true by maximizing your decoration!

